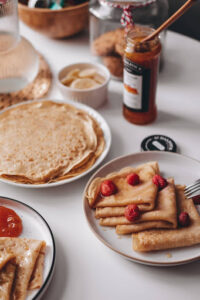
Nothing captures simplicity & sophistication quite like a crepe. Originating from my beautiful country of France, these thin, lacy pancakes are versatile whether you take the sweet or savory path, they are sure to please!
Ingredients: Yields 15 Crepes
– 300 grams all-purpose flour
– 3 large eggs
– 750ml whole milk
– 1/4 teaspoon salt
– 50 grams of butter
– Butter for greasing the pan
Instructions:
Step 1: Prep Work
Gather your ingredients and equipment – a whisk, a mixing bowl, and a non-stick crepe skillet (hyperlink). For best practice, I recommend a kitchen scale (hyperlink). The success of your crepe-making lies in the preparation, so ensure everything is within arm’s reach.
Step 2: Whisking Magic – Slowly but Surely
In a mixing bowl, combine flour and salt. Whisk to break down lumps to ensure the flour is smooth. Create a well in the center.(need a picture illustrating the well technique) In a separate bowl, crack your egg, adding one egg at a time to the well. Pour in melted butter. Whisk slowly to incorporate the flour gently. Then gradually add the milk while continuing to whisk until flour is fully incorporated. The goal is a smooth, silky batter(video of gif of how this should look)f that flows like liquid velvet!
Step 3: Resting Time
Allow the batter to rest for at least 1-2 hours. You can also leave overnight in the fridge. This rest time is a crucial step, as it allows the flour particles to fully absorb the liquid, resulting in a smoother batter and tender crepes. Patience, for the best things come to those who wait!
Step 4: The Sizzling Ballet
Once the batter has rested, heat your non-stick skillet over medium heat. Take a paper towel dipped in cooking oil and lubricate the pan. Pour a ladleful of batter into the center, swirling the pan to spread it thinly. This is where the real artistry comes into play.
Step 5: The Flip
As the edges of the crepe begin to lift, it’s time for the grand flip (approx 1-2 min). If you’re feeling bold, a flick of the wrist can send the crepe somersaulting through the air. Alternatively, a gentle nudge with a spatula will do the trick. (I usually play it safe!) The goal is an evenly cooked crepe with a touch of golden brown.
Step 6: Filling and Folding
Now the fun part – filling and folding. For a classic touch, a sprinkle of sugar and a squeeze of fresh lemon juice are timeless. Feeling indulgent? Spread a layer of Nutella & add sliced strawberries. Savory cravings? Consider a filling of sautéed spinach, mushrooms, and a sprinkle of feta. The possibilities are endless!
Step 7: Repeat and Revel
Repeat the process until your batter is finished, take a minute to take in the aroma of freshly cooked crepes that fills your kitchen. Whether you choose to enjoy them as a delightful breakfast, an elegant dessert, or a savory dinner option, homemade crepes are a testament to the joy of simple ingredients and the art of skillful preparation.

Crepe making has been a tradition in my family and culture stemming decades. I hope this inspires you to share it with your friends and family. As you see, it is simple to make but can impress your guests and can be quite versatile! Check out my crepe bar blog post for your next party or shower. And if you are interested in learning more about the history and origin of the beloved Crepe – read here (hyperlink)


